
Hi and Welcome to the documentation of Bulk Clone Professional for Jira
On the following pages we will guide you through the setup and usage of this plugin, and you will see how easy it is to get started and how intuitive the plugin is to use.
The documentation contains of the following chapters;
- Installation of the plugin
- Setup of the plugin
- Usage of the plugin
If you have support questions drop us a note here
Note: Some of the features listed below adheres to the latest versions of Bulk Clone Professional and Jira 10.x, these features may not exist for compatible versions prior to Jira 9.7
Check Release Notes on Atlassian Marketplace for specifics.
New features implemented up to Jira 9.6 was dropped from August 2024, only bug corrections adheres to these specific versions.
Installation of the Plugin
- Log into your JIRA instance as an admin.
- Click the admin dropdown and choose Add-ons. The Manage add-ons screen loads
- Click Find new add-ons from the left-hand side of the page.
- Locate Bulk Clone Professional via search. Results include add-on versions compatible with your JIRA instance
- Click Try free to begin a new trial or Buy now to purchase a license for Bulk Clone Professional. You’re prompted to log into MyAtlassian. Bulk Clone Professional begins to download.
- Enter your information and click Generate license when redirected to MyAtlassian.
- Click Apply license. If you’re using an older version of UPM, you can copy and paste the license into your JIRA instance.
- You’re all set! Click Close in the Installed and ready to go dialog.
Setup of the plugin
The configuration and setup of the plugin is very simple to accommodate and basically follow the same scheme as the built in Jira bulk operations
Default Settings – “Jira Administrator” and “Jira System Administrator” always has global access to Bulk Clone in all instances, all others must apply generic Jira Bulk Operation privileges;
- Global “Bulk Change” operational rights (Found under Administration|System in Jira)
- “Create Issue” permission for the Jira project(s) you are cloning to. (Check Jira Project’s permission scheme)
Special Permission Settings
Bulk Clone can clone without problem if even if the users has only Read Only rights to the source project(s). This is particular useful for instance if you have a “template project” which you want to Bulk Clone from, but want to protect the content of this project not to be altered accidentally by your users.
Usage of the plugin
Once you have configured the setup of the plugin as described above, it is now time to go to action and use it.
The Plugin appears as part of the native “bulk operations” in Jira, see link above how to set rights for these bulk operations
- From Jira Agile “Multi Select” the Backlog Items you want to Clone and “Right Click”
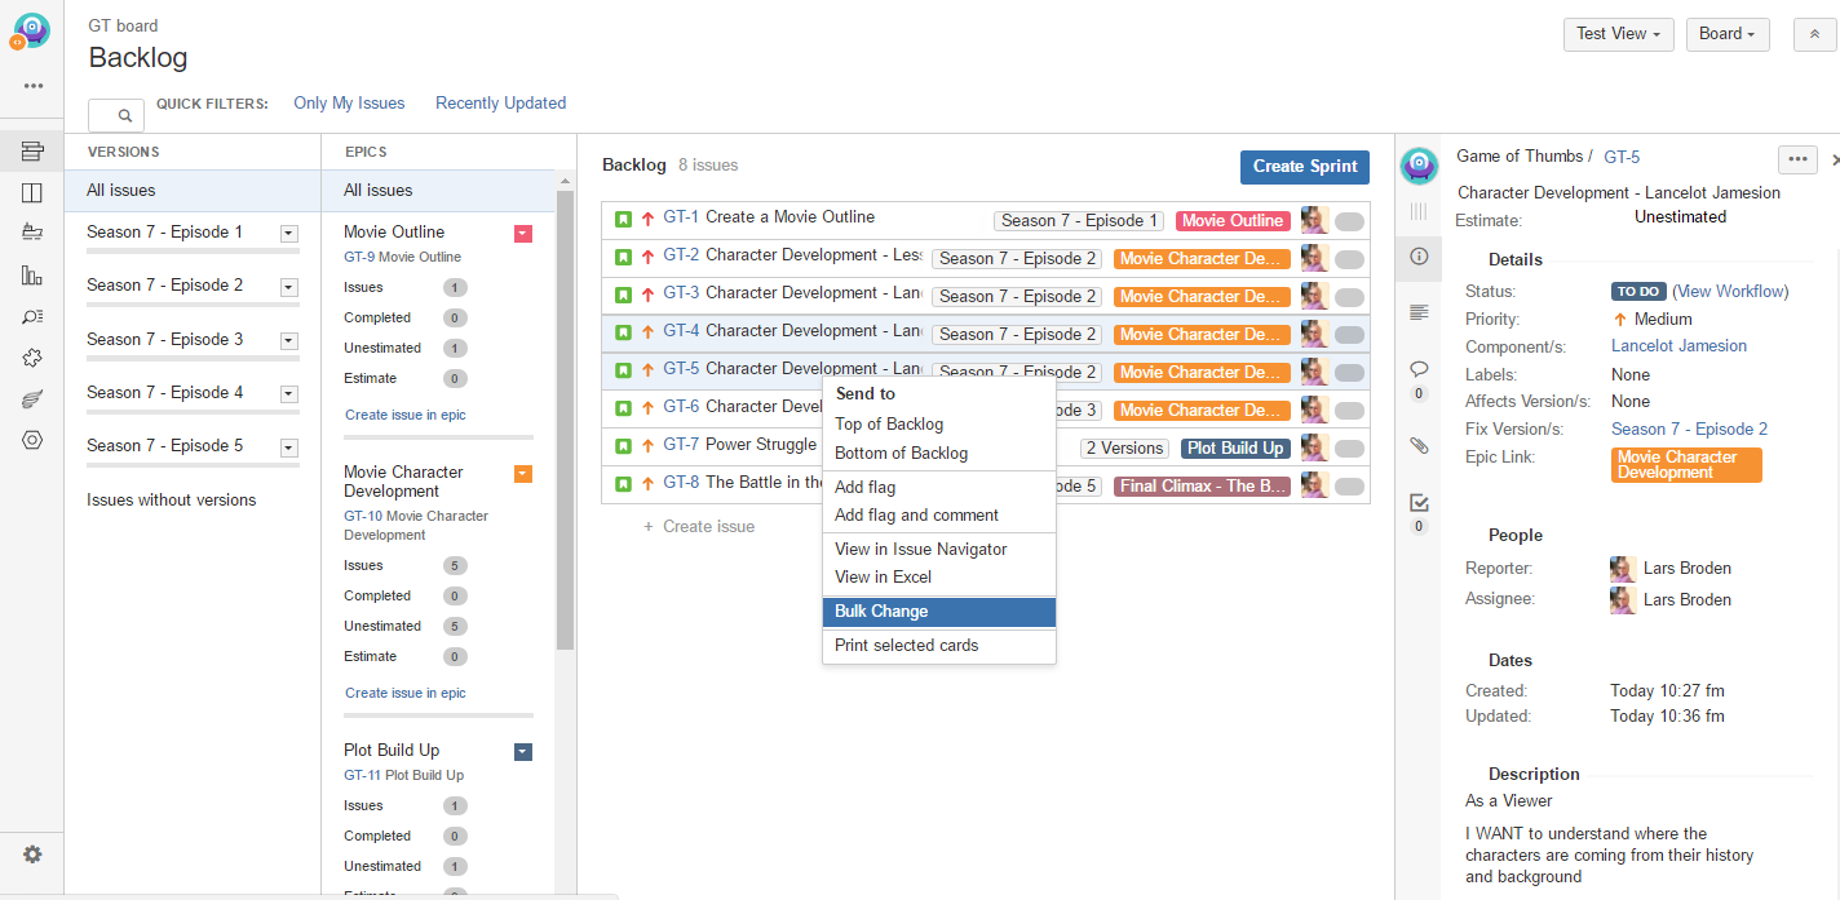
Bulk Clone Jira Agile Backlog Items
- From Jira: Go To: “Search for Issues” menu to query the result-set you want to clone, alternatively click on existing saved filter.
- Once the result set for the JQL builder is shown you can then choose “Bulk Change” in upper right corner (Ensure that you have user rights for this menu choice)
- The listings should look like the screenshot below;
Cloning Based on a Search Criteria/JQL Query
Once the “Bulk Change” menu choice has been activated you are prompted with the following scree
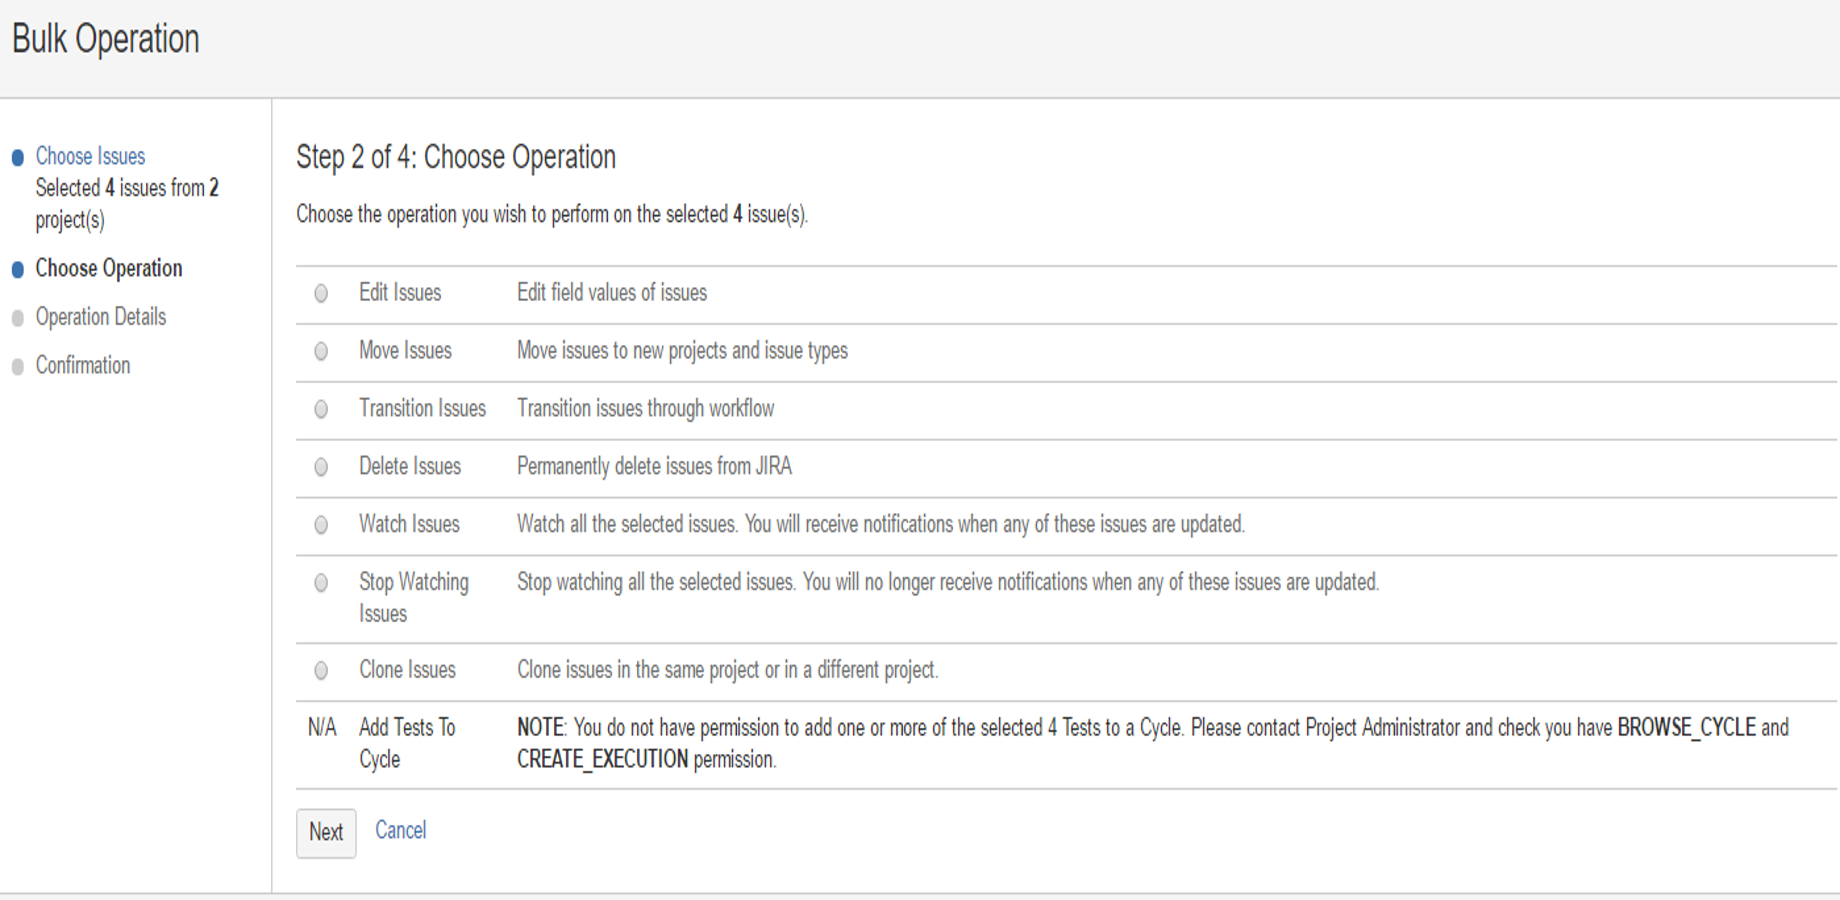
Additional “Clone Option” built into Jira Bulk Operations
- As you can see “Clone Issues” choice appears as a additional choice to Jira’s already existing built in bulk operations
- Once “Clone Issues” is chosen and you go “Next”, You are presented with your cloning options

“General” Section
- The “Clone Sub Tasks” – checkbox allows you to include/exclude cloning of subtasks for every parent issue in your filter. If you want to preserve the “physical order on the parent/child issues, simply add an “..ORDER By IssueKey ASC” in the initial the JQL Query for your result set to be cloned
- The “Clone Attachments” – checkbox allows you to include/exclude cloning of attachments for both parent issues as well as sub tasks.
- The “Clone Comments” – checkbox allows you to include/exclude cloning of comments associated to an issue, all comment threads for the issue is cloned if this option is checked.
“Issue Links” Section
- The “Clone Issue Links” – checkbox allows you to include/exclude cloning of any previous link relationships originating from the source set of issues.
- The “Edit Issue Links” – checkbox allows you to remap a specific link relationship to another link type. This assumes that the “Clone Issue Links” checkbox is enabled
- The “Add Clone Links” – checkbox allows you to included/exclude a “clone” link relationship between the source issues and it’s clone
- The “Add <Select Link Type> Link” – Dropdown will create the selected link type between the source & target issues. It gives you a possibility to “re-map” any curent link types into other ones for the cloned set.
- The “Rebuild Issue Links” – checkbox allows you to included/exclude a preservation of link relationships as they where in the source issues also to be reflected in the cloned set. This is particular useful while preserving hierarchies of link relationships between issue templates for instance.
“Jira Software” Section
-
- The “Rebuild Epic Link” – checkbox allows you to included/exclude a preservation of link relationships between the issue type Epic and its associated User Stories (associated through the Epic Link Field) if an Epic is also cloned. It includes that the Epic and its associated stories are included in the JQL Query as in this example;
- Epic/Child BulkCloning – (“Epic Link” Relationship)
-
- In native Jira JQL
- Project = GAME and “Epic Link” in (GAME-29, GAME-34) or Issuekey in (GAME-29, GAME-34)
- ..OR
- Project = GAME AND Key in (GAME-29, GAME-34)
-
- In 3:rd party plugin like “ScriptRunner”
- issuesInEpics(“project = GAME”)
- issueFunction in issuesInEpics(“project = GAME and status = ‘To Do'”)
- If you want to preserve the “physical order on the parent/child issues, simply add an “..ORDER By IssueKey ASC” at the end of the JQL Query
- Epic/Child BulkCloning – (“Epic Link” Relationship)
- The “Rebuild Epic Link” – checkbox allows you to included/exclude a preservation of link relationships between the issue type Epic and its associated User Stories (associated through the Epic Link Field) if an Epic is also cloned. It includes that the Epic and its associated stories are included in the JQL Query as in this example;
“Jira Advanced Roadmaps” Section
- The “Rebuild Parent Link” – checkbox allows you to included/exclude a preservation of link relationships between the Jira Portfolio parent issue type and its associated child issues (Most commonly Business Epics–>Features–>Stories) common in most Enterprise agility setup’s like the Scaled Agile Framework, here is an example on how to clone these hierarchies; (Note: for some of these examples it requires 3rd party plugins like ScriptRunner to be installed)
-
- Parent/Child Bulk Cloning (“Parent Link” Relationship)
-
- In native Jira JQL
- Project = GAME and “Parent Link” in (GAME-29, GAME-34) or Issuekey in (GAME-29, GAME-34)
- In 3rd party plugin like “ScriptRunner”
- issueFunction in portfolioParentsOf(“issuetype = Business Epic and Project = GAME”)
- issueFunction in portfolioParentsOf(“issuetype = Business Epic and resolution is empty and Project = GAME”)
- In native Jira JQL
-
- Parent/Child Bulk Cloning (“Parent Link” Relationship)
“Jira xRay” Section
This section and its functionality will only show on the Bulk Clone form if you have xRay installed, otherwise it is “hidden”.
- The “Rebuild xRay Test Set & Test Associations” – Checkbox allows you to included/exclude a preservation of link relationships between the Jira xRay “Test Set” parent issue type and its associated tests (test cases) (without cloning the link of the original source issues)
- To be able to clone the Test Set(s) and the associated tests see this example JQL queries
- Example 1: Single Test Set containing multiple Test Cases: Issue in testSetTests(‘XT-1’) OR key=XT-1
- Example 2: Multiple Test Sets containing multiple Test Cases: Issue in testSetTests(XT-1) OR Key in testSetTests(XT-8) OR key in (XT-1, XT-8)
- To be able to clone the Test Set(s) and the associated tests see this example JQL queries
- The “Rebuild xRay Test Plan & Tests/Test Set(s) Associations” – Checkbox allows you to included/exclude a preservation of link relationships between the Jira xRay “Test Plan” parent issue type and its associated tests or test sets (without cloning the link of the original source issues)
- To be able to clone the Test Plan(s) and the associated tests/test sets, see this example JQL queries
- Example 1: Single Test Plan containing multiple Test Cases/Test Set(s): issue in testPlanTests(XT-267) OR key = XT-267
- Example 2: Multiple Test Plans containing multiple Test Cases/Test Set(s): Issue in testPlanTests(XT-268) OR Key in testPlanTests(XT-271) OR key in (XT-268, XT-271)
- To be able to clone the Test Plan(s) and the associated tests/test sets, see this example JQL queries
- The “Rebuild xRay Test Executions & Tests/Test Set(s) Associations” – Checkbox allows you to included/exclude a preservation of link relationships between the Jira xRay “Test Executions” parent issue type and its associated tests or test sets (without cloning the link of the original source issues)
- To be able to clone the Test Executions(s) and the associated tests, see this example JQL queries
- Example 1: Single Test Execution containing multiple Test Cases/Test Set(s): Key in (XT-5) OR Key in testExecutionTests(XT-5)
- Example 2: Multiple Test Executions containing multiple Test Cases/Test Set(s): Key in (XT-5, XT-540) OR Key in testExecutionTests(XT-5) OR Key in testExecutionTests(XT-540)
- To be able to clone the Test Executions(s) and the associated tests, see this example JQL queries
- The “Rebuild xRay Test Pre-Conditions & Tests/Test Set(s) Associations” – Checkbox allows you to included/exclude a preservation of link relationships between the Jira xRay “Test Plan” parent issue type and its associated tests or test sets (without cloning the link of the original source issues)
- To be able to clone the Test Plan(s) and the associated tests/test sets, see this example JQL queries
- Example 1: Single Test Pre-Condition containing multiple Test Cases/Test Set(s): issuetype = Test AND key in preConditionTests(XT-331) OR key = XT-331
- Example 2: Multiple Test Pre-Conditions containing multiple Test Cases/Test Set(s): issuetype = Test AND key in preConditionTests(XT-331) OR key in preConditionTests(XT-332) OR key in (XT-331, XT-332)
- To be able to clone the Test Plan(s) and the associated tests/test sets, see this example JQL queries
- The “Remove the associations between Test(s) and Test Set(s)” – Checkbox allows you to Remove the Test Set & Test associations links on the cloned issues (Useful for a “barebone” Bulk clone without any prior associations preserved)
- The “Remove the associations between Test(s) and Test Plan(s)” – Checkbox allows you to Remove the Test Plan & Test associations links on the cloned issues (Useful for a “barebone” Bulk clone without any prior associations preserved)
- The “Remove the associations between Test(s) and Test Pre-Condition(s)” – Checkbox allows you to Remove the Test Pre-Conditions & Test associations links on the cloned issues (Useful for a “barebone” Bulk clone without any prior associations preserved)
- The “Remove the associations between Test(s) and Test Execution(s)” – Checkbox allows you to Remove the Test Execution & Test associations links on the cloned issues (Useful for a “barebone” Bulk clone without any prior associations preserved)
“Fields” Section
- The “Clone Labels” – checkbox allows you to include/exclude any previous labels on source issues, bot standard issue types and sub task issue types
- The “Clone Original & Remaining Estimates” – checkbox allows you to include/exclude any time Estimates for a particular issue, for instance User Stories, Test Cases, Incidents etc.
- The “Edit Target Field Values” – checkbox allows you to include/exclude editing of output values of Jira’s system & custom fields. You can select a free number of fields to alter the output for.
- The “Clone Status” – checkbox allows you to clone an issues workflow status. if the status exists in the cloned target project(s) it clones it directly according to the source issue status, otherwise you are presented with a “mapping screen” what you want to clone it to.
- The “Clone Resolution” – checkbox allows you to clone an issues workflow resolution. if the resolution exists in the cloned target project(s) it clones it directly according to the source issue resolution, otherwise you are presented with a “mapping screen” what you want to clone it to.
“Identify Output” Section
- The “Summary Prefix/Suffix” – field allows you to include/exclude a custom Suffix on the “Summary field. Note: “Hover” over the “Exclamation Symbol” to make use of dynamic variables into your “Summary Field”. Values for most system & custom fields can be copied into the summary field in the cloning operation
- The “Unique Label” – Text field allow you to attach your own customized label to easier identify the cloned set or generate a unique label by clicking the “knob symbol” to the right of the text field.
Once your are done with your customizing options, press “Next”
- The next screen that appears is the Cloning target projects and issue types
- Here you can choose to perform a Bulk Clone & Bulk Move into another target project in one go.
- You can also transfer core field values from one issue type to another issue type for the targeted project(s). If you don’t have a particular issue type in the target Project “Bulk Clone” still tries to do a “best fit mapping” to all common fields into the new issue type you have chosen for the targeted Project(s)
- You can also clone individual issue type values to different targeted Projects
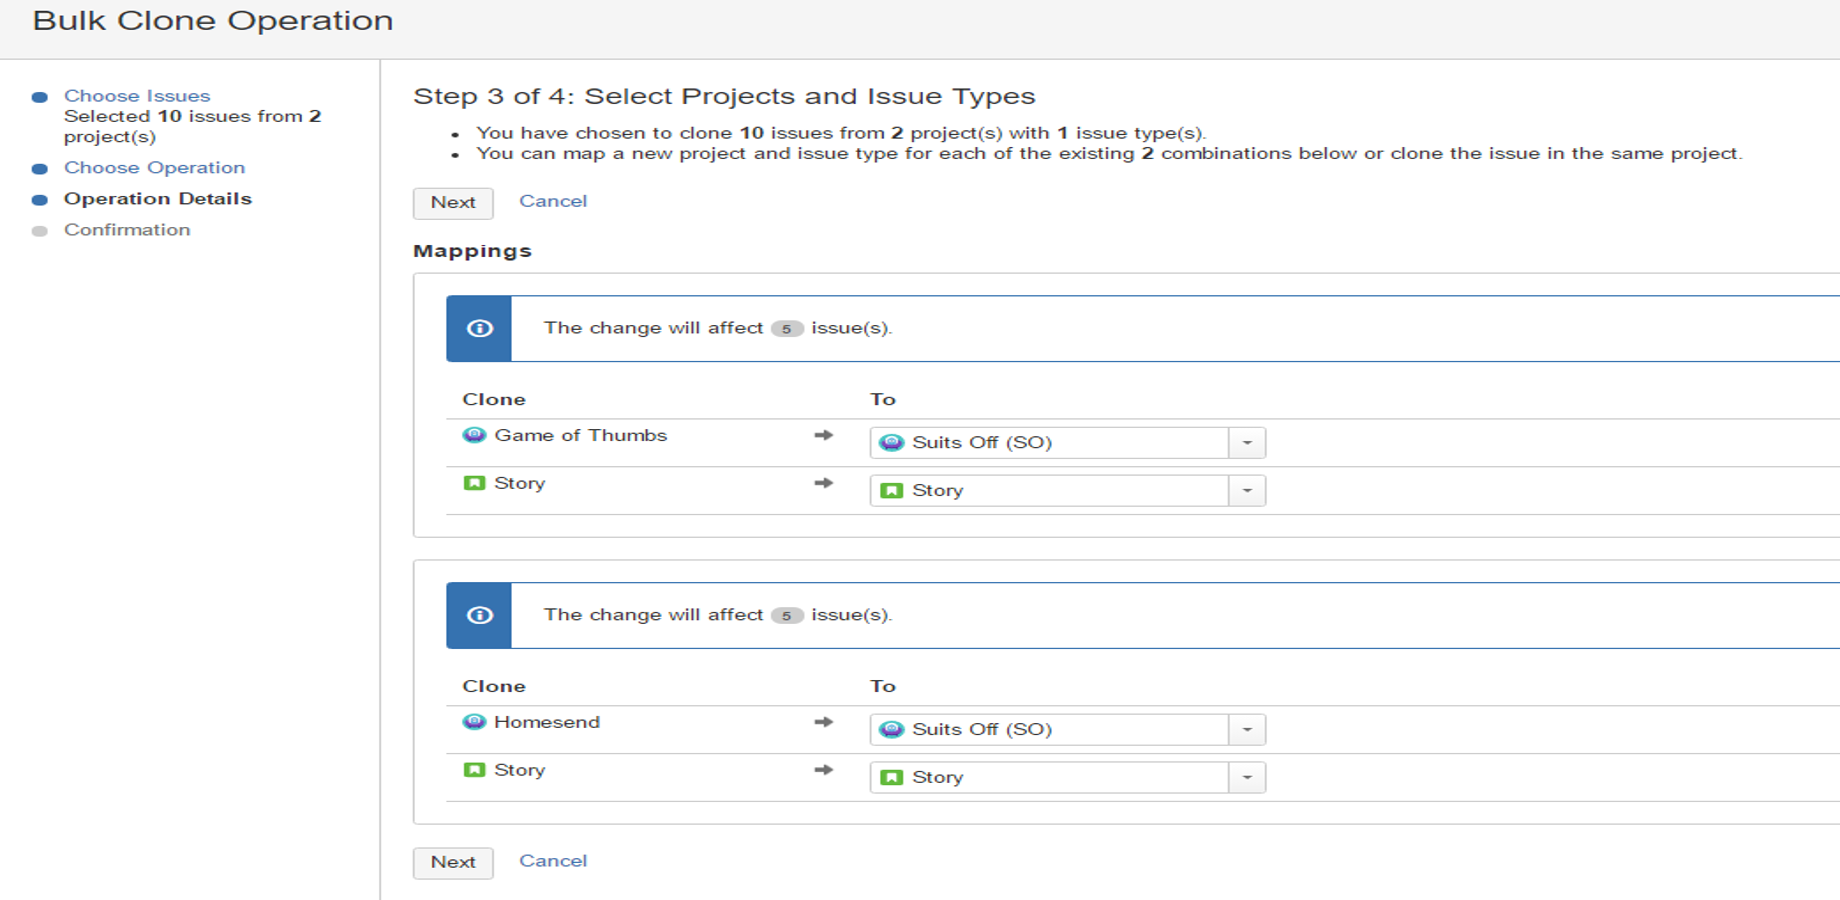
Remap your issuetype and/or Move your issues to another target project
Once you are done with choosing your targeted cloning Project(s) and issue type mapping, choose “Next”
- The same logic above that applies for standard issue types also applies for sub task types.
- You can choose to Bulk Clone certain sub task issue types to individual Projects or a different target project than the source project
- The same thing applies for transferring core field values from one sub task issue type to another sub task issue type for the targeted project(s)
The next step is to choose which System & Custom Field values you want to include for later alteration in your Clone set
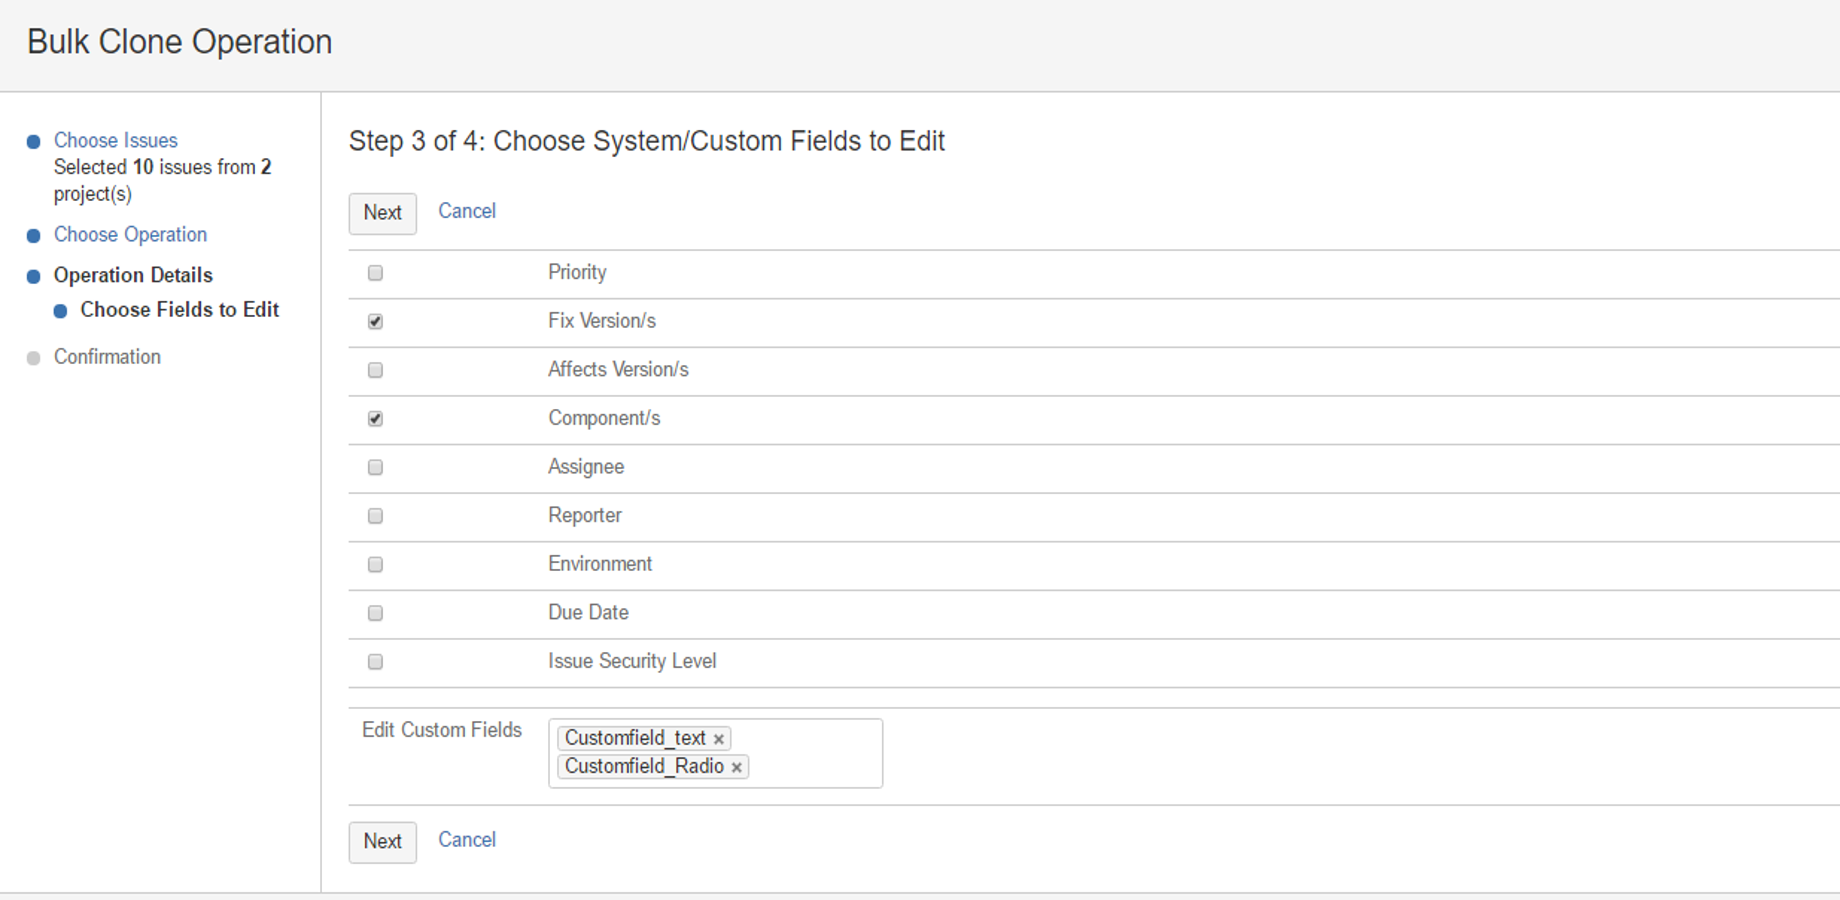
Here you can alter values for specific System & Custom fields
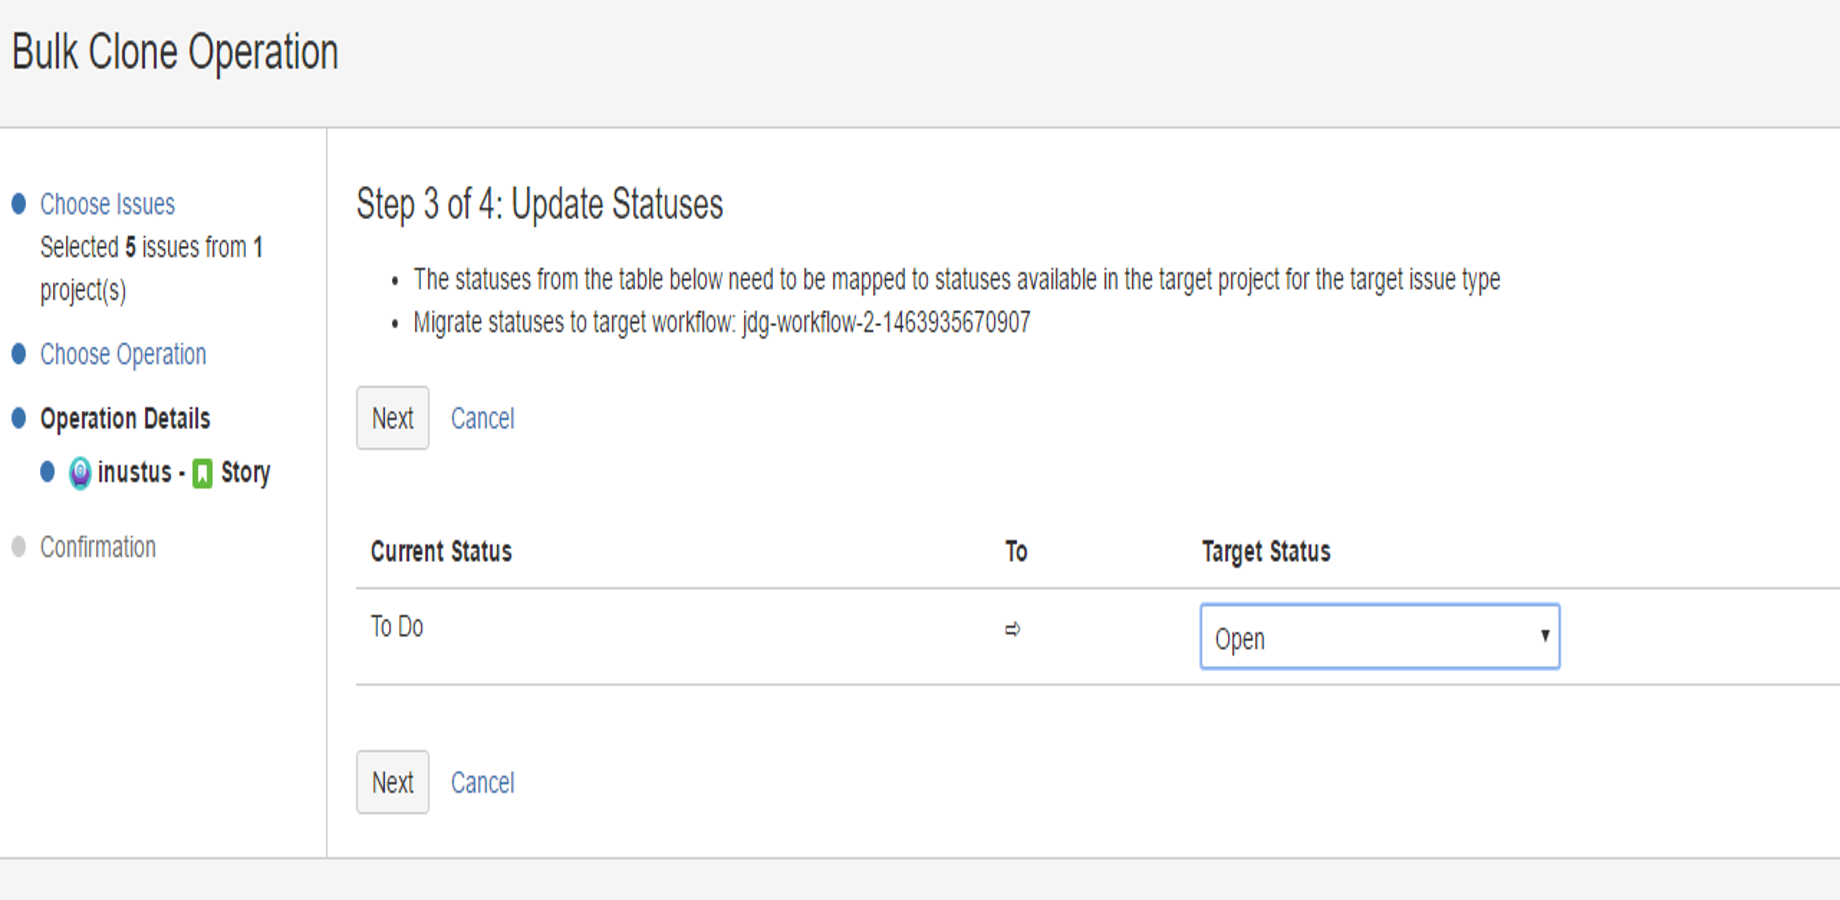
Alter Status on Issues
- This Screen allow you to alter the status on your issues to be something else in your cloned set. If the status can exists in the target project(s) a mapping is done directly and this screen never shows.
The next step in the process is to “Edit Links”, this assumes that you have checked both “Clone Issue Links” and “Edit Issue Links” in the beginning, otherwise this screen wont show.
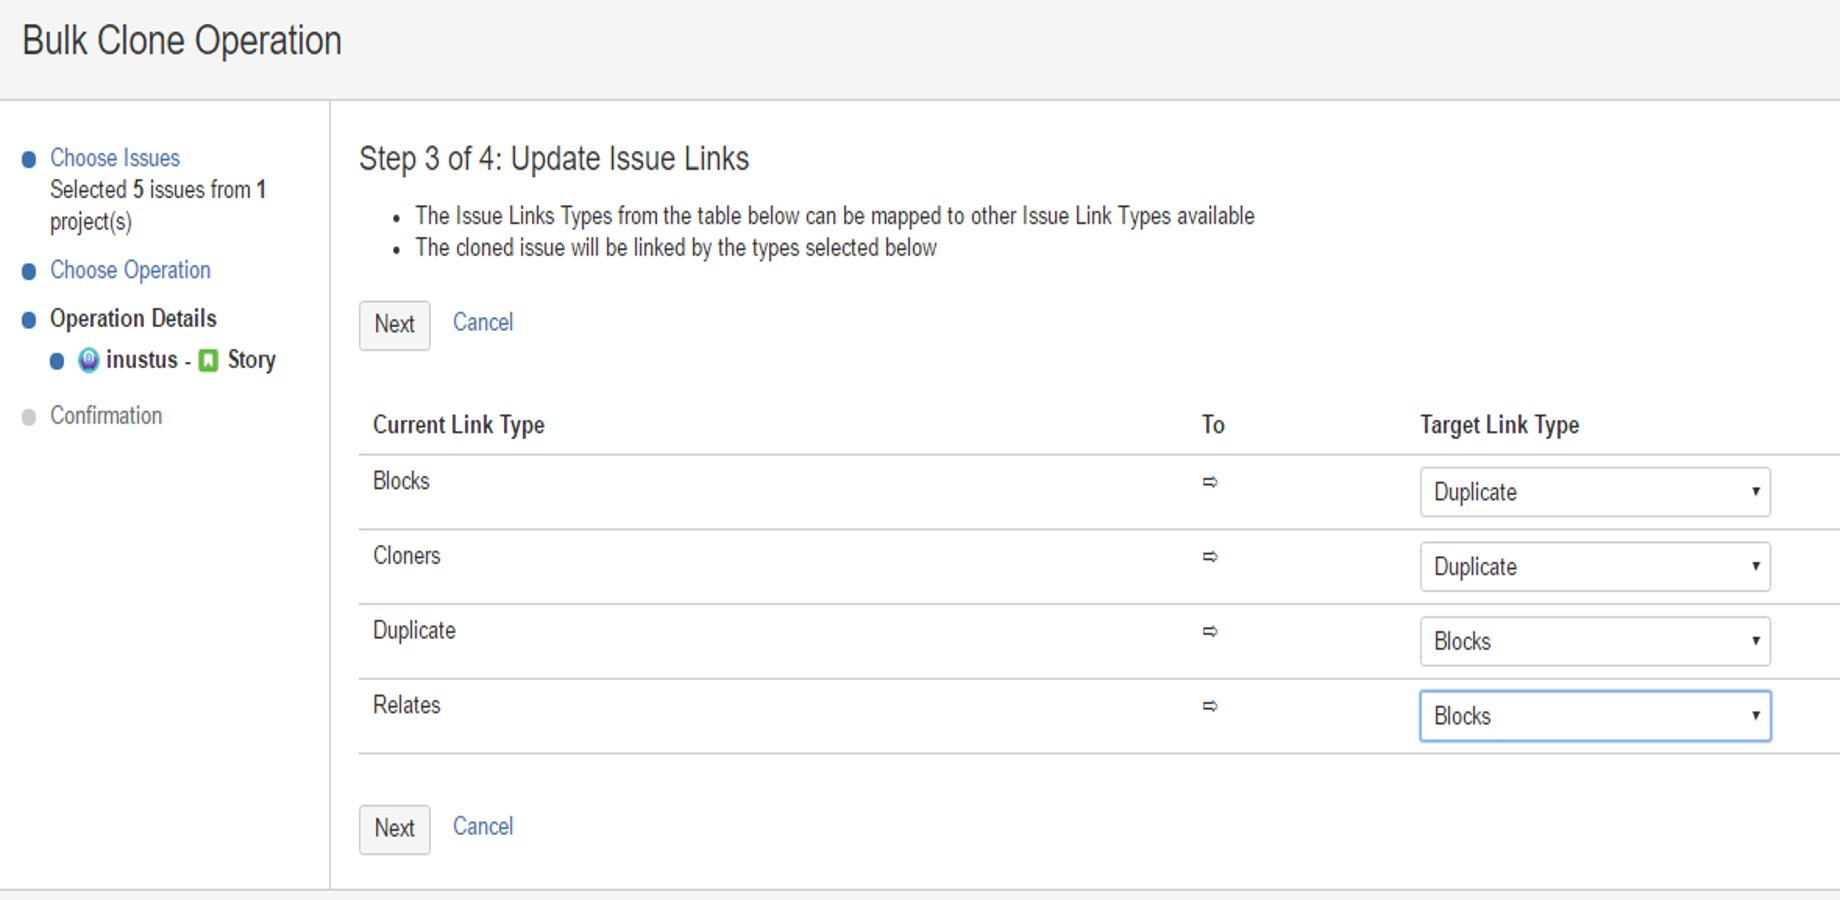
You can Edit your Link Relationships for your clone set
The final “Altering Step” is the possibility to alter/edit the value for the clone set on the System & Custom you chosen to include earlier. This screen wont show if you haven’t included any system or custom field for altering
- The next screen detects if you had mandatory fields among your source issues that has not been filled in, Bulk Clone then allows you to set new output values.
- Type in/Choose from drop down list or text field (depending of the type of mandatory field it is) and the new default value that you want your cloned set to have, alternatively also check-mark the “Keep” box on the right to preserve the original values to your cloned set
- Once your done press “Next” to go to the next screen
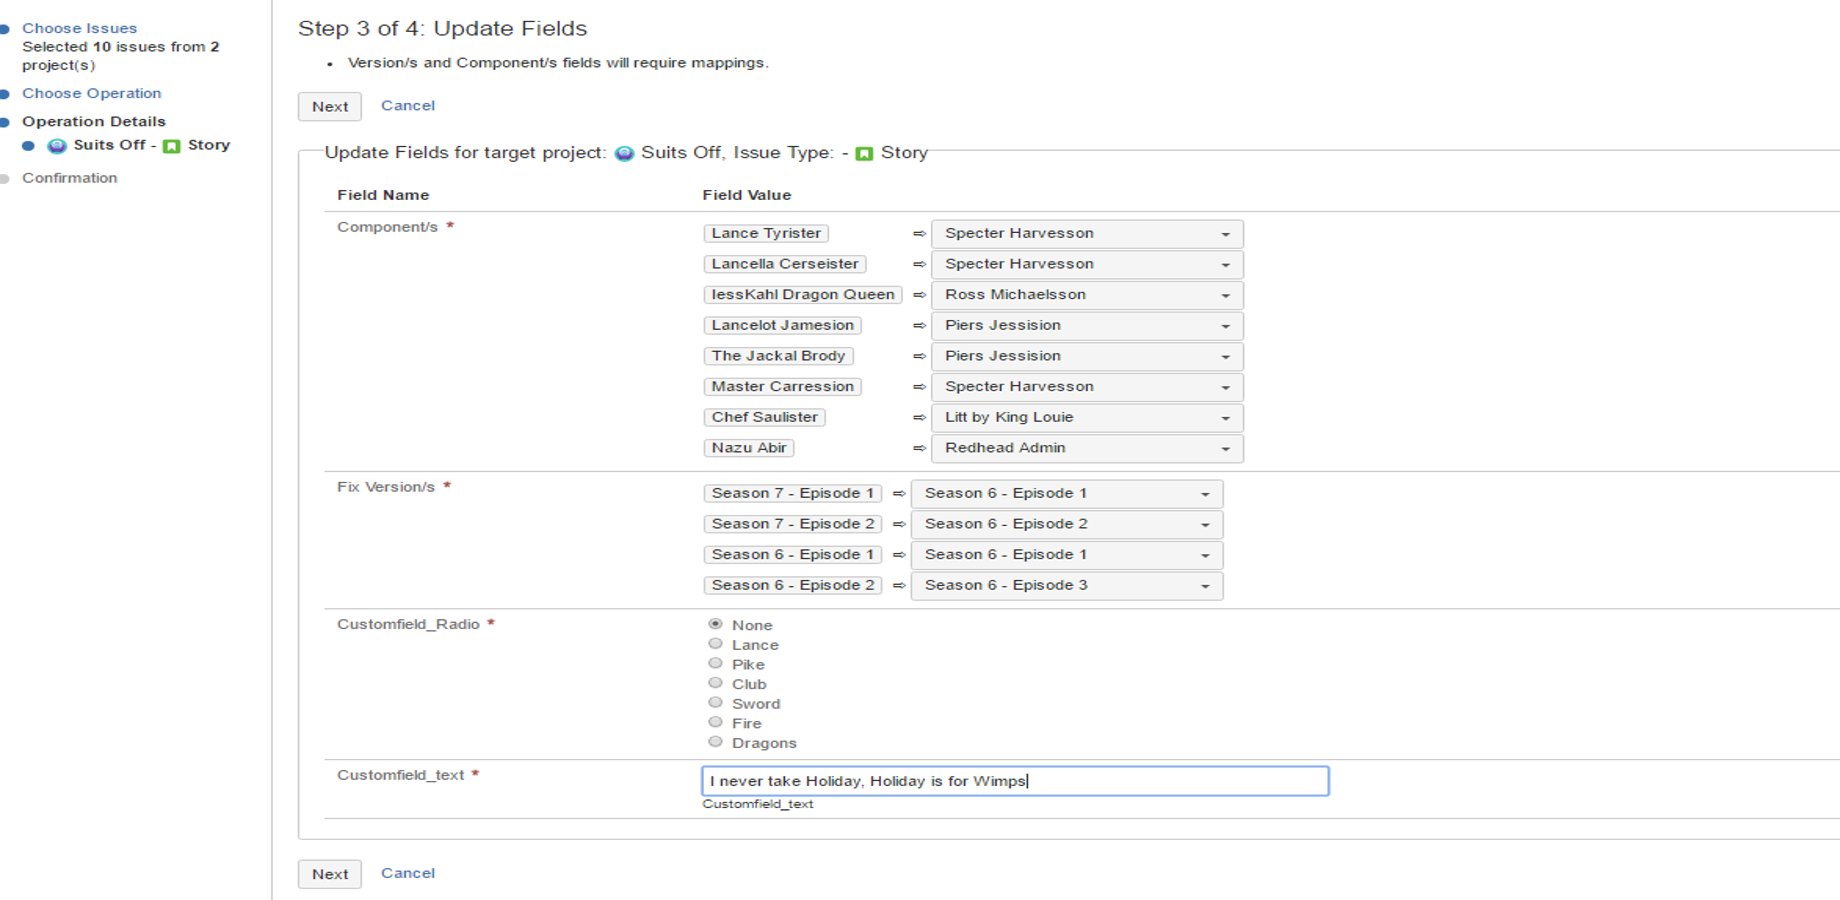
Set other output values on System & Custom fields for your clone set
Now you have set all the values for “Bulk Clone to operate on and your are presented with the “Confirmation Screen, Note: Bulk Clone will remember your customized settings in the browser cache if you need to clone repeatedly.
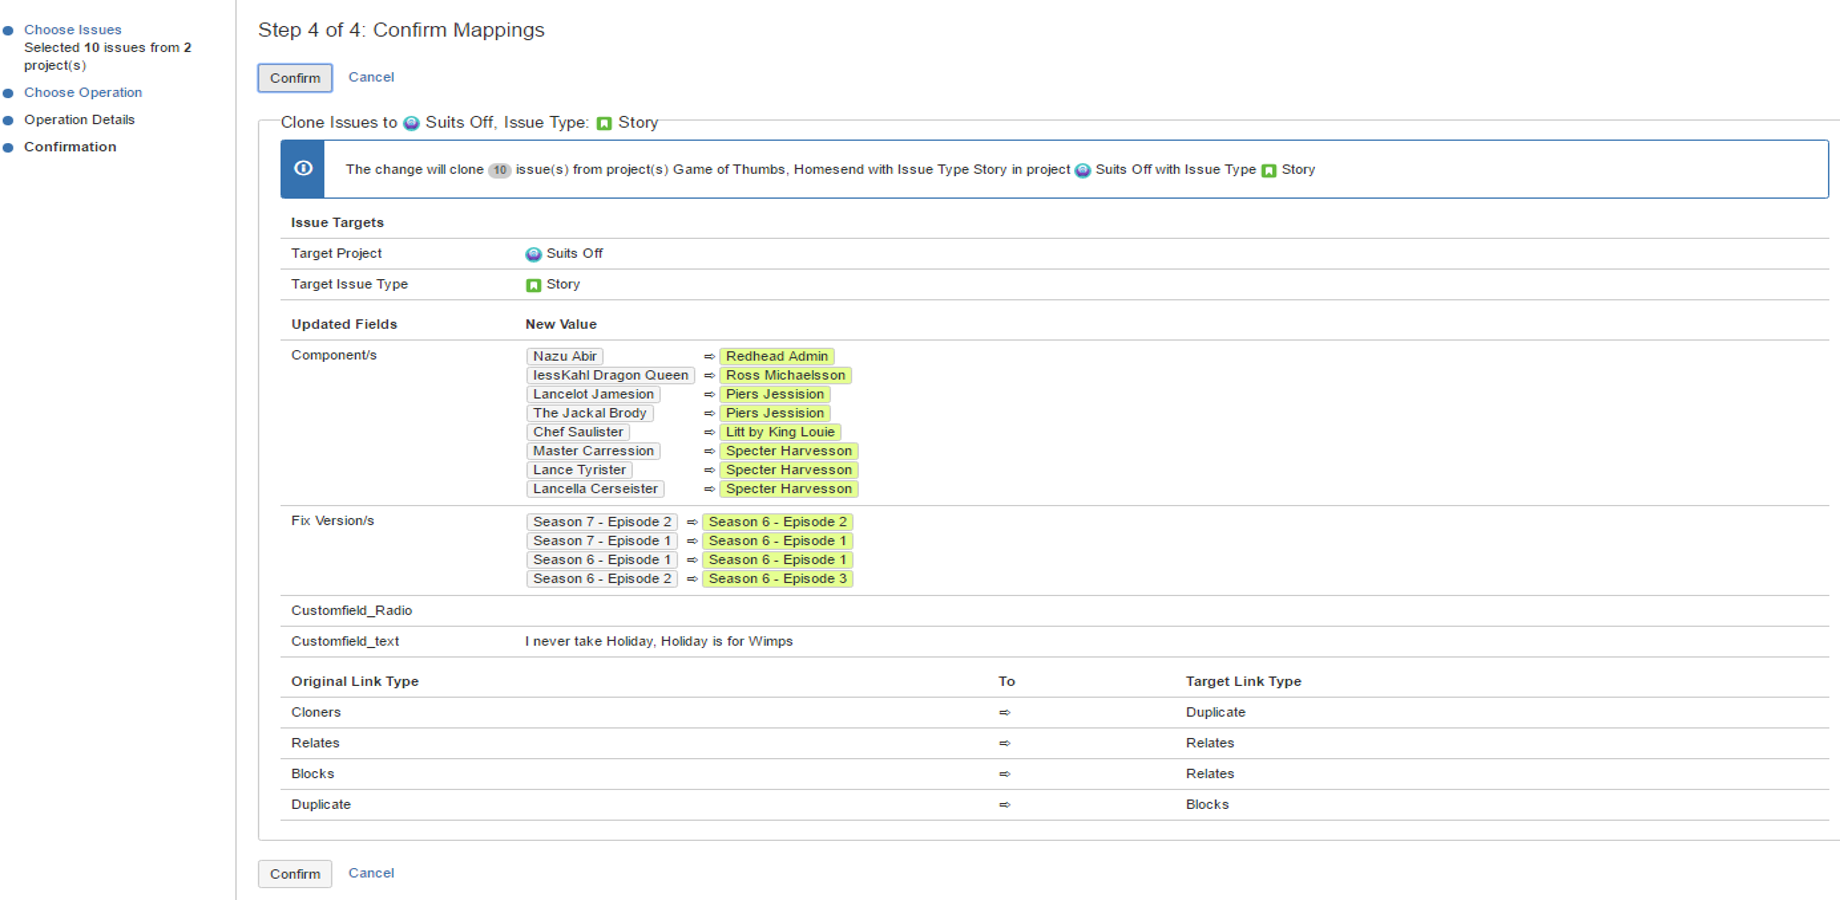
Confirmation Screen on all your altered values in all steps
Choose next to start the Bulk Cloning operation
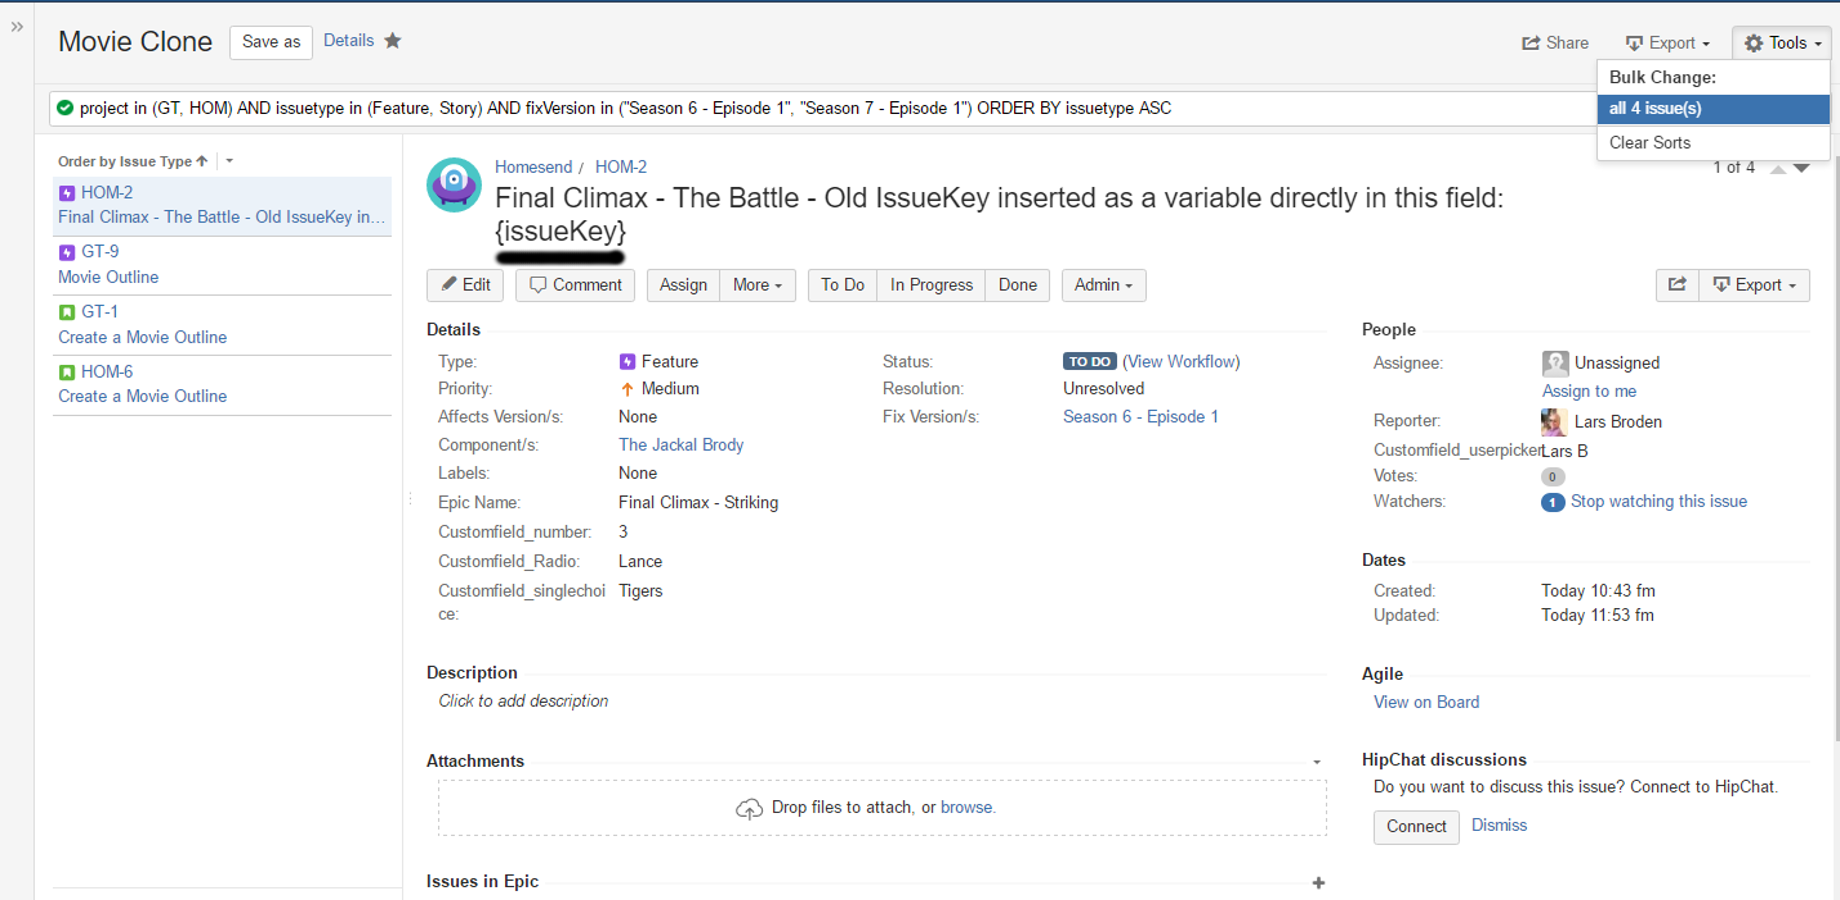
- Once the Bulk Cloning operation are done, your are presented with the result – Your cloned set
- Note: your custom label makes it easy for you to locate your issues, especially if you cloned to multiple target Projects
- Also note in the example that we have used a “Dynamic Variable” based on a customfield that has been copied over to the summary title, listed as {issueKey} + {Customfield_1254} aka “Lance”
- You are done
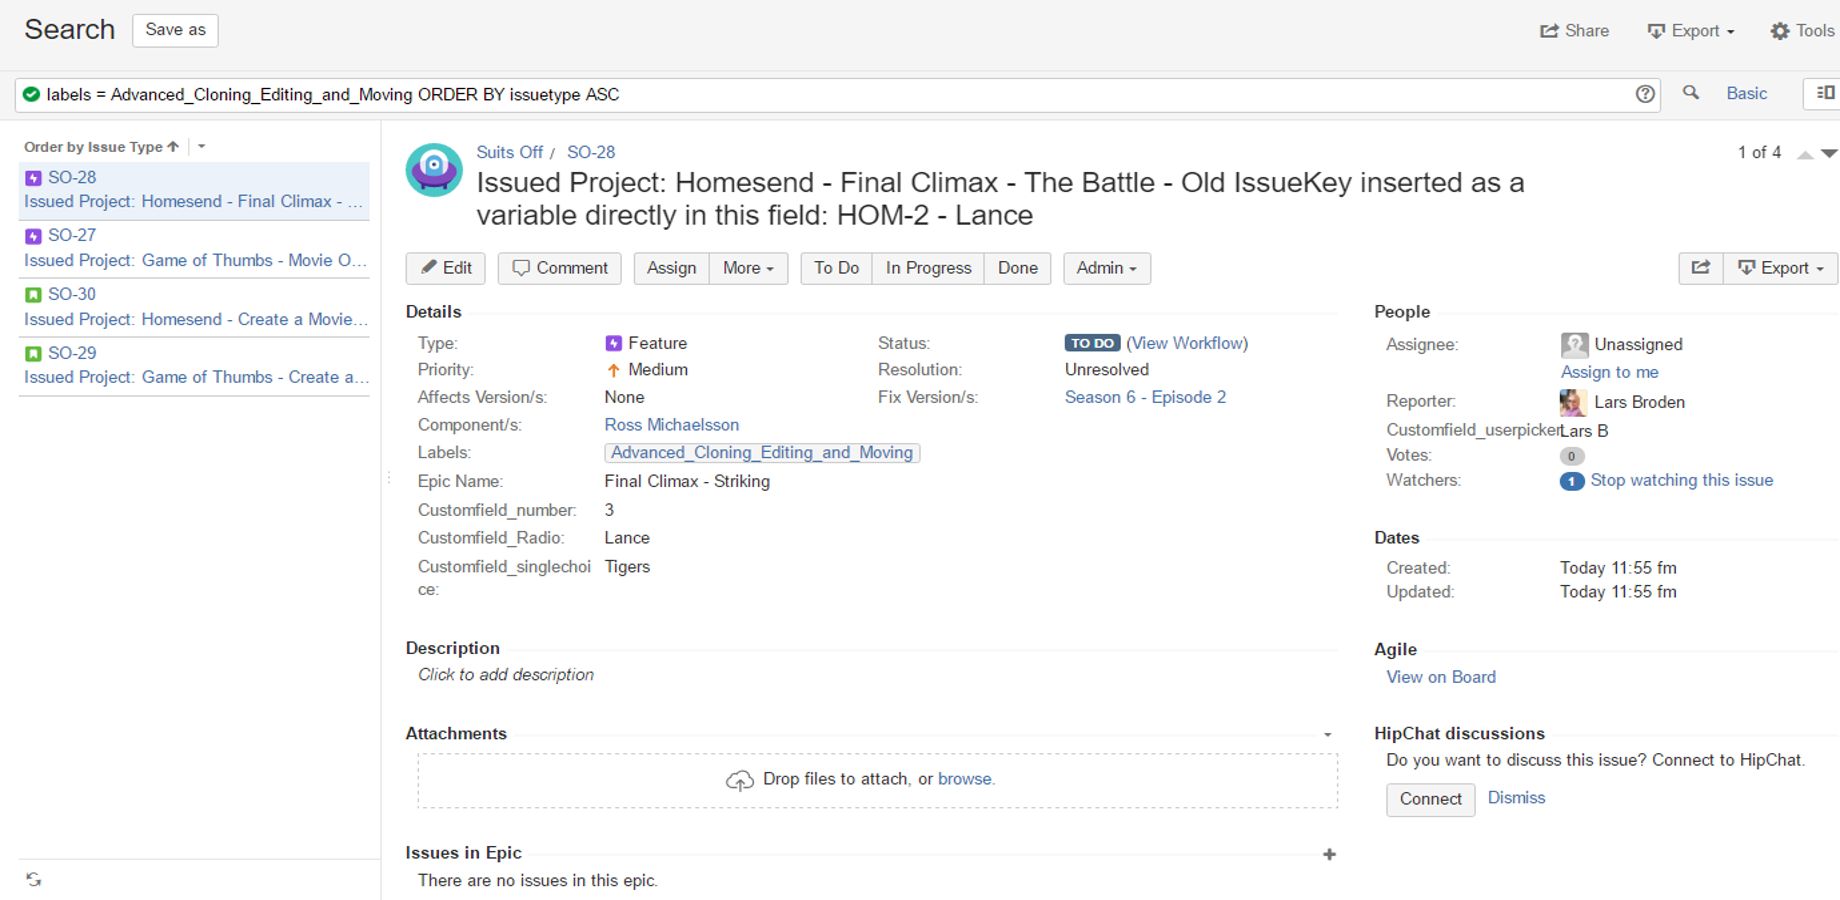
Your Cloned Result
Default Behavior of the Plugin during cloning operation
The following exceptional scenarios may occur while a Bulk Cloning operation is carried out and is handled in the following way;
Assignee Field Scenarios
- If the “Assginee” field for a source issue is “Unassigned” target issue is also set as “Unassigned” if global system settings allow it.
- If the “Assginee” field for a source issue is “Unassigned” target issue is set to “CurrentUser” if global system setting does not allow for “Unassigned” issues.
- If the “Assginee” field for a source issue is assigned to an “Inactive User”, the target issue is set to “Unassigned”
- If the “Assignee” field for a source issue is assigned to an “Inactive User”, the target issue is set to “CurrentUser” if the global system setting does not allow for “UnAsssigned” issues,
Reporter Field Scenarios
- If the “Reporter” field is disabled for a particular Jira Project, the “Reporter” field is set to “Anonymous”
- If the “Reporter” field is enabled and the source issue “Reporter” field is “Blank”, CurrentUser is set for the Report field for the target issue
- If the “Reporter” field is enabled and the source issue “Reporter” field has a Reporter, the Report field for the target issue is populated accordingly
- If the “Reporter” field for a source issue is referring to an “Inactive User”, “Reporter” field in the target issue is set to “CurrentUser”.
Good luck with your Bulk Clone Professional for Jira & Jira Agile Plugin
Yours Sincerely
Lars Broden

We offer professional services within Software Management, Enterprise Agility, Process Engineering, & Tooling. We also offer commercial IT add-ons for Workflow Management Products

We have extensive worldwide experience in countries such as United Kingdom, Germany, United States, France, Sweden, Denmark and others